zondag 13 oktober 2019

Sunday Bloghop Snowfall

Sunday bloghop!
Scrol vooral naar beneden om de lijst met andere deelnemers te zien, klik op een naam en bewonder alle prachtige creaties.

Hallo allemaal, happy sunday! Welkom bij de "gebruik sneeuw op je kaart" bloghop. Wij, in de Europese markt, kunnen geen pufpaint e.d. kopen, daarom mogen wij embosspasta gebruiken om sneeuw te maken.
Ik heb zo'n lol gehad tijdens het maken van deze kaart, met een glimlach op mijn gezicht elke keer als ik naar Elfie keek!
Hij geniet er duidelijk van om in Winterwonderland te zijn.


Je maakt dit winterwonderland op de volgende manier:

Begin met een 9 x 6 inch basic black basis kaart, met de vouw in het midden.

Snij een stukje coastal cabana cardstock af op 4 1/4 x 5 3/4 inch, spray met water en gebruik de tuffed emboss folder.
Ik maak mijn papier goed nat, om een mooi resultaat te krijgen zonder barstjes en/of scheurtjes. Laat aan de lucht drogen of gebruik de heattool.

Neem een stukje aquarelpapier van 4 x 5 inch en breng een watercolor wash aan met lovely lipstick, lekker fel.
Plak dit een beetje schuin op het coastal cabana.

Nu is het tijd om je lint aan te brengen, ik heb het dubbel gekleurde coastal cabana/granny apple green gebruikt. 

Gebruik basis black en de heirloom rechthoek frame embossfolder om je lijstje te maken. Ook hier het cardstock gesprayed met water.

Stans het grote label van de stitched label dies in granny apple green en steek het onder/op het lijstje.
Bevestig dit geheel op de kaart met diamensionals. 

Nu is Elfie aan de beurt!
Ingekleurd met waterpenseel en lovely lipstick, granny apple green, coastal cabana, so saffron en sahara sand. De randen van muts en jas kleur je niet.
Droog voor de zekerheid met de heattool.
Nu breng je embosspasta aan op deze randjes. Voorzichtig goed binnen de lijntjes, anders neemt de pasta direct de kleur van de inkt aan.
Knip het uit en leg even opzij om te drogen.

Stans bladeren in sahara sand met de beautiful boughs dies en lijm deze in de hoeken van de lijst.
Wanneer Elfie is opgedroogd.....bevestig hem met diamensionals op de bladeren.

Make nu een kleine dennenappel uit basic black en sahara sand. Lijm deze bovenop de bladeren.

Nu tijd om op de bladeren embosspasta aan te brengen. Je kan heel riant zijn, want als het opgedroogd is, is het altijd minder, beetje ingezakt en ook breder.

De tekst gestempeld in zwart op een stukje aquarelpapier, uitgestanst met de kleine stitched label.

Om het helemaal af te maken heb ik een paar lovertjes toegevoegd.

In de loop van de dag heb ik nog drie keer embosspasta toegevoegd om het weer wat hoger te krijgen.

Sunday Bloghop!
Please scroll to the end of this post to see the other participants and all the beautiful creations.

Happy sunday everyone and welcome to the "put snow on your card" bloghop.
We still can't buy pufpaint or else, and that's why we, European market, are allowed to use embossingpaste as snow. 

I totally loved making this card with a big smile on my face everytime I looked at Elfie!
He sure is in winterwonderland having fun.

How to build this winterwonderland:

Start with a basis black card 9 x 6 inch, fold in the middle.

Cut a piece of coastal cabana of 4 1/4 x 5 3/4 inch and run it through the tuffed embossfolder. 
I always spray my paper very wet to get a good embossed piece without crinkles. Let airdry or use the heattool.

Take a 4 x 5 inch piece of watercolor paper and make a lovely lipstick watercolor wash. You can use an very intense color.
Glue it a little bit diagonal on the coastal cabana.

Now it is time to add your ribbon.

Make a frame with the heirloom rectangle embossfolder in basis black.
Die cut the stichted label in grany apple green and glue it to back and front in 
the frame.
Use diamensionals to put it on the card.

Now it's time to make Elfie!
I watercolored it with lovely lipstick, granny apple green, coastal cabana and some very light sahara sand for the face and so saffron for the hair.
Don't color where the embosspaste is, the white paste will immediately color red or yellow, stay between the lines.

Die cut some sahara sand beautiful boughs leaves, glue them in place and apply the embosspaste. Make the little pine apple with sahara sand and basic black. Glue on top of the leaves and also add some paste. Let dry.
If Elfie is dry too, adhere him with diamensionals.

I stamped the sentiment on a scrap of watercolor paper and die cut it with the stitched label dies.

To finish it all of I used some (retired) flower sequins.

I think I put on extra paste three times, cause when the paste will be less when it's dry.

Ik hoop dat je genoten hebt van de winterwonderland sfeer en je wellicht geïnspireerd wordt om zelf met sneeuw aan de slag te gaan.

I hope you enjoyed my winterwonderland and maybe it inspires you to create your own.

Fijne zondag verder!

Enjoy your sunday!

Creative love, Christine

dinsdag 20 augustus 2019

Autumn Daisies

Welkom op mijn blog en wat leuk dat je de tijd neemt om niet alleen bij mij, maar ook bij alle andere deelnemers van de bloghop te kijken. Klik op een naam op onderstaand lijstje en je gaat van blog naar blog.

Welcome on my blog and I appriciate it that you are taking the time not only to visit my blog, but from all the other participants also. Just click on a name in the list below and you hop from blog to blog.

Het is weer tijd voor de SU home deco bloghop en deze keer een grote lijst vol met herfst bloemen. Hiervoor heb ik 24 grote en kleine daisies ingekleurd, op elkaar geplakt, een beetje in model gebracht en voorzien van een hart uit het magnolia set en een heldere faceted gem.
De grote bloemen hebben 2 lagen, de kleine 3.
De dennenappels zijn onderdeel van het Beautiful Boughs stans set evenals de groene bladeren.
De rode besjes is een stans uit het First Frost set.
De achtergrond is gemaakt met embossing pasta en een nieuw stencil met de stippen op zowel zwart als daffodil delight.

It's time for a new SU home deco bloghop and this time I made a big silver frame full of autumn flowers/daisies.
I collored 24 small and big flowers, glue them together and shaped the petals. The heart is from the Magnolia dies and added a clear faceted gem.
I used 2 layers for the big flower and 3 for the little one.
Leaves and pineapples are from the Beautiful Boughs dies, the red berries are made with a First Frost die.
The background is made with a new stencil and embossingpaste, on black and daffodil delight cardstock.
De inktkleuren die ik gebruikt heb zijn: daffodil delight, lovely lipstick en coastal cabana. Het lijkt alsof er meer kleuren gebruikt zijn, maar ze blenden prachtig naar groen, roze en grijs.
De dennenappels zijn samengesteld uit early espresso en crumbcake karton.

The inkcolors I used are: daffodil delight, lovely lipstick and coastal cabana. It looks as if I used more colors, but they blend beautifully to pink, green and grey.
The pineapples are made with early espresso and crumb cake cardstock.
Onder de bloemen heb ik een groot label in lovely lipstick geplaatst uit het Beautiful Boughs stansen set en een flink stuk zilveren lovertjes band.
Inkleuren met inkt en waterpenseel is toch wel een van mijn meest favoriete bezigheden, het heeft mijn voorkeur boven het stempelen in kleur. De intensieve kleuren sprankelen je tegemoet en je kunt de bloem zoveel kleuren geven als je wilt.

Underneath the flowers I added the big label from the Beautiful Boughs die set and a long piece of silver sequins ribbon.
I love to color with ink and aquapainter, I prefer it instead of stamping in color. The colors are more vibrant and multiples on one flower.
Het woord "Wonder" is een afgeplakt sentiment uit het Rooted in Nature set. Ik vind het heel toepasselijk want het is toch vaak een wonder als je kijkt naar de kleuren in de natuur en de bloemen variaties.

The word "Wonder" is a partial stamped image out of the Rooted in Nature set. It fits in this collage, cause you see wonders looking at all the colors and flowers variations in nature itself.

Het Daisy Lane stempelset is biedt zoveel verschillende mogelijkheden voor elk seizoen en thema. Ik hoop dat ik je hiermee een van de vele heb kunnen laten zien.

The Daisy Lane stampset has so many possibilities for every season and theme. I hope that I showed you one of them with my autumn framed daisies.

dinsdag 23 juli 2019

Stampin' Up Home Deco Designers Choice Bloghop

Bloghop 23 juli 2019
Designers Choice

Veel dank Sara Levin voor de home deco uitnodiging. Het is mijn favoriete onderwerp, projecten waar je lang van kunt genieten. Daar houd ik van!

Thank you Sara Levin for inviting me to this bloghop. Home deco is my favorite to make: it will be items you can enjoy for a very long time. Love that!
De techniek is masking.
Een wellicht onverwachte combinatie van bloemen, maar het resultaat is zo mooi geworden. Het kost redelijk wat extra tijd, bijna elke stempel nogmaals afdrukken op masking tape, veel uitknippen, maar het creëert diepte, originele combinaties en zoveel nieuwe mogelijkheden.
De basis is een A5 formaat aquarel papier en gestempeld met Archival zwart. Begin ergens in het midden met de grootste bloem en werk van daaruit verder.
Als extra nog drie uitgestanste bloemen en een tule strik.

Masking technique.
Well maybe an unexpected combination of flowers, but the result is far more lovely then I expected.
It will cost you extra time and patience (stamp everything a second time on masking tape en hand cut) but you get depth, original combinations of stamps and so much extra possibilities.
The base is an A5 piece of watercolor paper and I stamped with Archival black.
Just place your first bigger stamp in the middle and work your way to both sides of the paper.
To finish it all of, I added three die cut flowers on the frame with a tule bow.
Een foto van het art piece voor het inlijsten.
Het geeft een goede indruk van de hoeveelheid stempel afdrukken en dat het bij bloemen helemaal niet uitmaakt wat je combineert, het is altijd mooi.

A picture of the art piece before framing it.
It gives you a good impression of the amount of stamped images and that it doesn't matter wich flowers you combine, it's always lovely.
Het was lang geleden dat ik deze techniek heb gebruikt, alles begon met een idee voor een notebook cover die echt vlak moest zijn. Alleen een stempel afdrukken vond ik niet zo spannend....
Een leuke impressie van een blad vol masking tape en werk in uitvoering.

It was a long time age that I used the masking technique. Everything started with a notebook cover that has to be totally flat. Just a stamped image was not that interesting to me...
Now you see a fun impression of a piece almost covered in masking tape and a work in progress.
Het eind resultaat van de notebook kaft. Ik was erg onder de indruk en wilde daarna meer en groter.
Het beste aan deze techniek vind ik het verrassingselement. Wanneer alles onder de masking tape zit heb je eigenlijk geen idee wat er onder vandaan gaat komen. Die verrassing is alles waard. 
Zodra alle tape is verwijderd krijg je de mooiste prijs: een enorme kleurplaat voor een lange tijd rust en genieten.

The end result of the notebook cover. I was very impressed, wanted more and bigger.
The best part of this technique is the big surprise element. When everything is covered in masking tape, you have realy no idea what you are going to see when it's all removed. That surprise is worth all the time and work.
As soon as you remove all the tape you get the best gift: a huge coloring page for a long time of joy.

Neem ook een kijkje bij de andere blog deelneemsters om hun mooie creaties te zien. Klik eenvoudig op de naam in onderstaande lijst.

Enjoy the bloghop and see all the other beautiful creaties by simply clicking on a name in the list below.

Gebruikte materialen:
Good Morning Magnolia stampset
Band Together stampset
Aquarel papier
Archival inkt zwart

Ingekleurd met:
Crushed Curry
Powder Pink (R)
Balmy Blue
Pear Pizzazz
Garden Green
Highland Heather

Used materials:
Good Morning Magnolia stampset
Band Together stampset
Watercolor papier
Archival black ink

Colored with:

Crushed Curry
Powder Pink (R)
Balmy Blue
Pear Pizzazz
Garden Green
Highland Heather


zondag 14 juli 2019

Sunday Bloghop Above the Clouds

Hallo allemaal, het is weer Sunday Bloghop en vandaag staat de bundel Above the Clouds in de spotlight.
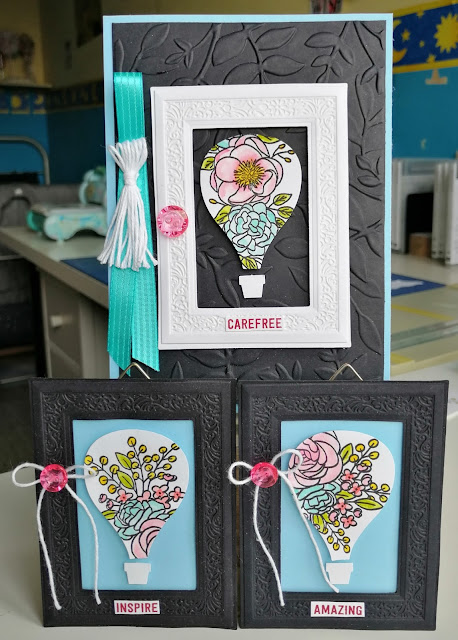
Het begon allemaal met het stempelen en inkleuren van veel... Bloom & Grow bloemen stempels. Daarna met de luchtballon pons een hele stapel uitgeponst.
Bewust weinig toegevoegd en de focus op de bloemige ballonnen gelaten.
De Heirloom emboss kaders zijn een prima ATC maat, leuk om uit te wisselen. Ik heb op de achterkant plakhaakjes aangebracht, zodat je de keuze hebt om de kaartjes ergens op te hangen.

Hello everyone! It's Sunday Bloghop time and this time it's all about the Above the Clouds bundle.
I started by stamping and coloring a lot... of Bloom & Grow stamps punched out a stack of balloons.
Didn't add a lot of embellishments, so the focus stays on the flowery balloons.
The Heirloom embossed frames are a perfect ATC card size, nice to change those cards out. Yes you can hang them with the little hook I glued on the backside.
Het tweede deel van de bloghop is een 3D item. Ik heb gekozen voor klein houten 2-vaks theedoosje. Het tussenschotje verwijderd, beplakt met Balmy Blue en het zoveel mogelijk op de kaarten laten lijken. De frames zijn nu met de hand geknipt, kleiner, zodat het in het doosje past.
De ballonnen hangen aan dik handgaren, gaatjes in het stukje karton, stevig plakband erop en het geheel tegen de bovenkant gelijmd.
Een rij vlaggetjes, ook gemaakt met de ballon pons en op de bodem kraaltjes gelijmd. Het is zo leuk, de ballonnen bewegen als je langs loopt. Wat is er toch veel mogelijk met deze bundel.

The second part of the bloghop is a 3D item. I have chosen a little wooden teebag box, removed the devider and glued Balmy Blue cardstock in it. I wanted it to look as much as possible as the cards. Now I hand cutted the frames, so I could make them smaller to fit in the box.
The balloons have a thick thread that goes through little holes in the cardstock, adhered with cellotape and than liquid glue to hang it at the seeling.
The flags are also made with the punch and on the bottom I glued beats.
So funny as the balloons can move freely as you walk by.
De achtergrond is ook, net als de grote kaart, gemaakt met de 3D leaves embossfolder, deze keer gekleurd met de aquapainter.

The background has the same 3D leaves embossfolder as the big card, now I used the aquapainter to color it.
De puntjes op de i zijn deze keer de prachtige gefacetteerde knopen.

To finish it all of I used the faceted buttons.

Ik hoop dat ik heb laten zien hoeveel er mogelijk is met deze bundel en dat het maken van 3D items makkelijker is dan het lijkt. Fijne zondag!

I hope that I showed you how much is possible with this bundle and that making a 3D item is easier than it looks. Happy sunday!

Neem even de tijd om de prachtige creaties te bekijken van alle deelnemers, mooie inspiratie genoeg.

Please hop over to the next blog to see al the beautiful creations from the other participants, there will be a lot of inspiration.

donderdag 4 juli 2019

Creating Kindness Techniek Bloghop: Waterverf met Zout

 
Het thema is 'Favoriete techniek'. Een makkelijke, want inkten, kleuren met inkt, spelen met water en op deze manier achtergronden maken doe ik het liefst. Nu met een twist: het zoutvaatje....
Het vel aquarel papier zet ik vast met tissue tape op een plastic snijplank. Vervolgens maak je het papier goed nat en breng je de kleuren inkt aan. Als het nog nat is, strooi je er direct met zout overheen. Laat het aan de lucht drogen, met een heattool gaat het te snel en is het effect minder.
Het zout absorbeert het water en dat geeft de leuke twist aan de inkt achtergrond.
In dit geval heb ik standaard zout gebruikt, met grove zeezout korrels is het effect heftiger, heel leuk om te variëren met verschillende soorten.

The bloghop theme is "Your favorite technique". Well that's simple: watercoloring. This time with a twist: using salt.
First I attach the watercolor paper with tissue tape on a piece of plastic. Then wet the paper good and apply your colors.
When still wet, sprikle salt and let air dry. No heattool: it's drying to fast and the effect of the salt is less visible.
The salt absorbs the water and that gives the nice twist to your background.
Experiment wit different types of salt: different sizes of grain make different effects. Really fun to experiment with.
Op deze foto zie je het zout-effect erg goed, je ziet op sommige plaatsen nog waar het zout gelegen heeft. Wanneer het goed is opgedroogd, kan je het zout er voorzichtig afvegen met je hand of een zacht penseeltje.
Het meisje van het All Wonders set ingekleurd met dezelfde kleuren. Daarna heb ik haar een flinke extra haardos gegeven door het haar nog drie keer te stempelen, eronder te lijmen en te voorzien van bling steentjes.
De achtergrond suggereert een nachtelijke hemel, om dat te versterken nog wat zilveren sterretjes geponst en een ruime hoeveelheid zilverdraad achter de stempel.
Gebruikte kleuren: Night of Navy, Gorgeous Grape en Grapefruit Grove.

This picture shows the salt-effect good, you can tell where the grain has been.
When your paper is all dry, you can gently remove the salt with your hand or soft brush.
I colored the All Wonders girl with the same colors. Then gave her lots of extra hair: stamped the hair three more times and added some rhine stones.
The background suggest a night sky, so I punched some silver stars to underline that idea. Added silver metalic thread underneath to finish it of.
Used collors: Night of Navy, Gorgeous Grape and Grapefruit Grove.

Dank voor de bloghop uitnodiging en het bezoeken van mijn blog.

Thanks for the bloghop invitation en your visit on my blog. 

Blog Hop Participants


Video Hop Participants
1.  Charlet Mallet – https://youtu.be/jfFKK5ME7al
2. Jay Soriano – https://youtu.be/3GDLnBGqQFg
3. Paula Dobson – https://you.tu/ocsCbhe_As0

zondag 9 juni 2019

Sunday Bloghop In Colors

Hello everyone, it's my first time hopping on Sunday and I hope you like it.
To highlight the new Incolors, I made a bookbox and used the beautiful Butterflies Wishes stampset.
I started of by making a bookbox that I designed myself, so you can case it. Using the Woven Tread dsp, some embossingpaste, all the new ribbons and sadly only four in color pads (can't order purple posy due to quality issues).
Did all the stitching by hand, just make holes with a ruler as your guide.
The tassel is made with the new wisper white bakers twine and linen tread.
The book is meant to stand up, so you can see the back. For that reason I made the back the same as the front.
I want the impression of a real somewhat vintage spine, and make scorelines all over it.
Surprise! When you open it there is a little collage with the Butterfly Wishes stampset, a frame made with the country floral embossfolder and lots of dsp.
Everything is cut by hand. The middle butterfly got a little key from the bird trinkets, put some linen tread through it.
The left side has a cross, so you can stick a card in it or a piece of paper with a personal message.
The card to go with the bookbox is made in the same way and yes, the hand stitching took me a while....but came out very straight. I also used the catalogue with lovely examples as an inspiration.
The inside has some dsp to and some stamping, this stampset is gorgeous!
Are you excited yet? Good, here comes my first little tutorial:

BOOKBOX
TURORIAL
We start with the cover:
Cardstock: 6,5 x 11 inch
Score at the long side at 4 3/4 - 5 - 5 1/4 - 5 1/2 - 5 3/4 - 6 - 6 1/4.
Now you made the scorelines for the spine. 
If you don't like this, you can score only 4 3/4 and 6 1/4.
Fold the scorelines and try to make the spine round (if you don't have all the scorelines use a bonefolder or gluebottle).
Now it's time for the lining.
Cardstock: 9 1/2 x 6 inch.
Score at the long side: 4 1/4 and 5 1/4.
Use sticky tape or glue and position the lining exactly on top of the first and last scoreline on the cover.
Left and right from the scorelines, so you don't stick it in the spine :-)
This not only keep the spine together and round, but now you have also a strip of cardstock where you can glue the box against.
Box time!
It's a re-inforces box, so you don't see the flaps that hold the box together.
A piece of cardstock: 8 1/4 x 9 3/4.
Score at all sides at 1 and 2 inch.
Then cut of a hair from als sides, so the re-inforced piece of cs doesn't sit too tight into the fold.
Fold all the scores, burn them a little and cut of the corner pieces.
If so, you and up with something similar as on the photo.
First you make a box, glue all the four flaps in place and then the re-inforce sides.
 
Tadaaa! If everything went well, you will end up with a book like this.
For picture purposes... the lining on the left side is not glued down, ofcourse  it has to.
When you find the box too high or not closing good, you can always make the box a little smaller. Just score at 15/16 and 1 14/16 or just a hair.
I hope you like it, a book has so much possibilities, you can put a gift in it, make a layout, keep photos in it and so on.
Wish you all a lot of fun!
I hope you excuse me for my not always perfect English and if you have any questions just ask.
Thank you so much Sara for asking me to hop along.
Love Christine

Hop over to see all the other posts:


woensdag 19 december 2018

Needle Point Nook Kaarten


Een prachtige bundel met zoveel mogelijkheden die allemaal even mooi zijn.
Het stempelen met distinctive stempels vraagt wat geduld, een stevige mat onder je papier en het uitproberen van veel kleuren. Niet alle kleuren, met name lichte, geven even goede resultaten.
Het wauw moment als de stempels er dan inderdaad geborduurd uitzien is een feestje!

Het maken van de kaarten gaat vrij snel, de stempels en snijmallen doen eigenlijk al het werk.
Het gaat als volgt:

KAART 1 MET DSP
Basis kaart: Tranquil Tide cardstock 9 X 5 3/4 inch, ril op 4 1/2
Whisper White cardstock 4 X 5 1/2 inch
Needle Point Nook dsp 5 1/2 X 1 1/4 inch

Stans de grote stiksteekjes snijmal in het witte karton zoveel mogelijk naar rechts.
Plak het dsp links, stempel de kruissteekjes, de kleine vlinders en de tekst direct op het karton.
Stempel de grote bloem 2x, de set van drie kleintjes 2x en de geborduurde takjes 2x op wit karton en stans deze uit.
Gebruikte kleuren: Night of Navy, Tranquil Tide, Lemon Lime Twist en Old Olive.

Stans 4 kleine blaadjes uit Lemon Lime Twist en twee grote uit Tranquil Tide.

Breng nu eerst silver metallic draad aan alvorens je collage op te plaklen.
De grote bloemen passen presies in de uitgestanste geborduurde takken. Eerst de bloemen erop geplakt, daarna met dimensionals op de kaart.
Speel een beetje met alle onderdelen tot je een collage hebt die je mooi vindt.

KAART 2 MET GAREN EN SPELD
Basis kaart: Lemon Lime Twist 9 X 5 3/4 inch, ril op 4 1/2
Tranquil Tide 4 X 5 1/2 inch
Een strook Lemon Lime Twist 5 1/2 X 2 5/8 en een strook Whisper White van 5 1/2 X 2 1/4 inch.

Spray met een spritzer gevuld met water en een paar druppels Lemon Lime Twist refill lichtjes over het witte karton, droog met de heattool.
Stempel de stiksteekjes tegenover elkaar en daarna de tekst er tussen, respectievelijk met Tranquil Tide en Real Red.
Stans of pons de cirkel met kartelrand. Ik had nog groen garen dat sterk lijkt op Tranquil Tide. Het garen is er twee keer omheen gewikkeld. Zet de begin en eind draad vast met plakband en laat een stukje draad hangen.
Neem een mooie kopspeld en steek deze door het middelste dikke stukje zodat deze goed blijft zitten.
Lijm het op het karton.

Stempel 3 grote bloemen, twee kleintjes, 3 geborduurde takken en een setje van drie kleine bloemetjes op wit karton en stans deze uit.
Gebruikte kleuren: Real Red, Chocolate Chip (R), Old Olive en Tranquil Tide.

Plak de witte en Lime strook op elkaar, vervolgens met foamtape (niet te dicht aan de kant) op het Tranquil Tide.
De bloemen gehalveerd en de collages gemaakt.

Have fun creating!

Sunday Bloghop Snowfall

  Sunday bloghop! Scrol vooral naar beneden om de lijst met andere deelnemers te zien, klik op een naam en bewonder alle prachtig...

Populaire berichten